

Spine Rescue: How 3 Simple Strategies Can End Your Back Misery
Transform Pain Into Performance

Back pain is crippling.
It was around 2004/2005: Any time I stood longer than 5 minutes, the pain in my lower back became unbearable.
The only remedy - sit down.
I was studying sports sciences at the time. I spent hours upon hours in the sports hall practicing for my gymnastics test for nothing—I failed it twice, prolonging my gymnastics career even longer.
My motto: The more, the better.
Do strength training on top of gymnastics practices to have the required body tension for gymnastics - yep, I did it.
"I am young, my body can do this."
I was able to get through my sports studies because I was pain-free while moving.
But before things got better, they got worse: The pain was not limited to my back, it traveled across the left side of my body:
Elbow
Knee
I went to different orthopedists who did examinations on me and ran an MRI-scan. They could not identify the reason, nor could they find a solution until... more on that shortly.
During that time I remembered what my professor of sports anatomy said: Put different people under an MRI and you will find people who - based on disc protrusion or herniated disc - should be in severe pain, but are pain-free.
Others are creeping on all four into the MRI from excruciating pain, but the doctor cannot make a formal diagnosis.
Which means?
In a majority of all cases, even qualified doctors cannot name the real reason for back pain. There often is not a single causing factor, but a multitude of lifestyle-based decisions and habits causing it.
The fact is:
Up to 80% of the population will experience back pain at one point in their life.
But here`s the good news: Most back pain disappears by itself after 3-6 weeks.
This is Health Creator, a weekly publication that helps busy professionals like you get a high-performing body and stress-resilient mind.
Here are the most recent posts sent to subscribers:
Depending on the severity of the pain, these won't be the best 3-6 weeks you'll ever spend.
The pain limits your freedom:
1) Leaving the bed like an 85-year-old with crippling pain
2) Not being able to tie your shoes because that position is unbearable
3) Not being able to lift your kids off the ground or even play with them.
Add absenteeism from work and medical bills to it - enough to make you hate life during this time.
Measures to avoid that? There are many, too many to cover them all here.
We will focus on the part of movement, meaning we will cover the 3 pillars of a healthy spine:
Strength
Flexibility
Balance
Let`s look at each and then the corresponding exercises.
Strength: This systematic review and meta-analysis found that exercise significantly reduces the risk of low back pain (LBP). Specifically, exercise alone was shown to reduce the risk of LBP by 33%
So exercise alone is a powerful measure to prevent back pain or reduce the time of being in pain.
Professor Stuart McGill, a world-renowned spine scientist, researcher, and university professor with hundreds of peer-reviewed articles and books such as Lower Back Disorders has a minimalist program called "The Big Three"- Exercises for lower back pain.
It`s meant for people like you: Little time, with a history of back pain or the goal to strengthen your back before the pain hits you.
"These exercises focus on the transverse abdominals (deep core), obliques (side of abdominals), and multifidus (small muscles which stabilize the spine)."1
Strength-Exercises


Move 1: The Curl-Up
At first glance, the McGill curl-up might appear similar to an abdominal crunch. However, lordosis (natural bend) of the lumbar spine is maintained with McGill’s exercise.
Lie on your back, on a firm surface.
Bend one knee and place your foot on the ground. Keep the opposite leg straight.
Reach your arms behind and position your hands underneath your low back. This will help preserve your arch during this exercise.
Lift your head, shoulders and upper back off the floor, as a unit. Try not to move each area individually.
Hold this position for 10 seconds, then slowly lower back down.
Aim for 10 repetitions of this exercise, performing five with one knee bent, then repeat on the opposite side.

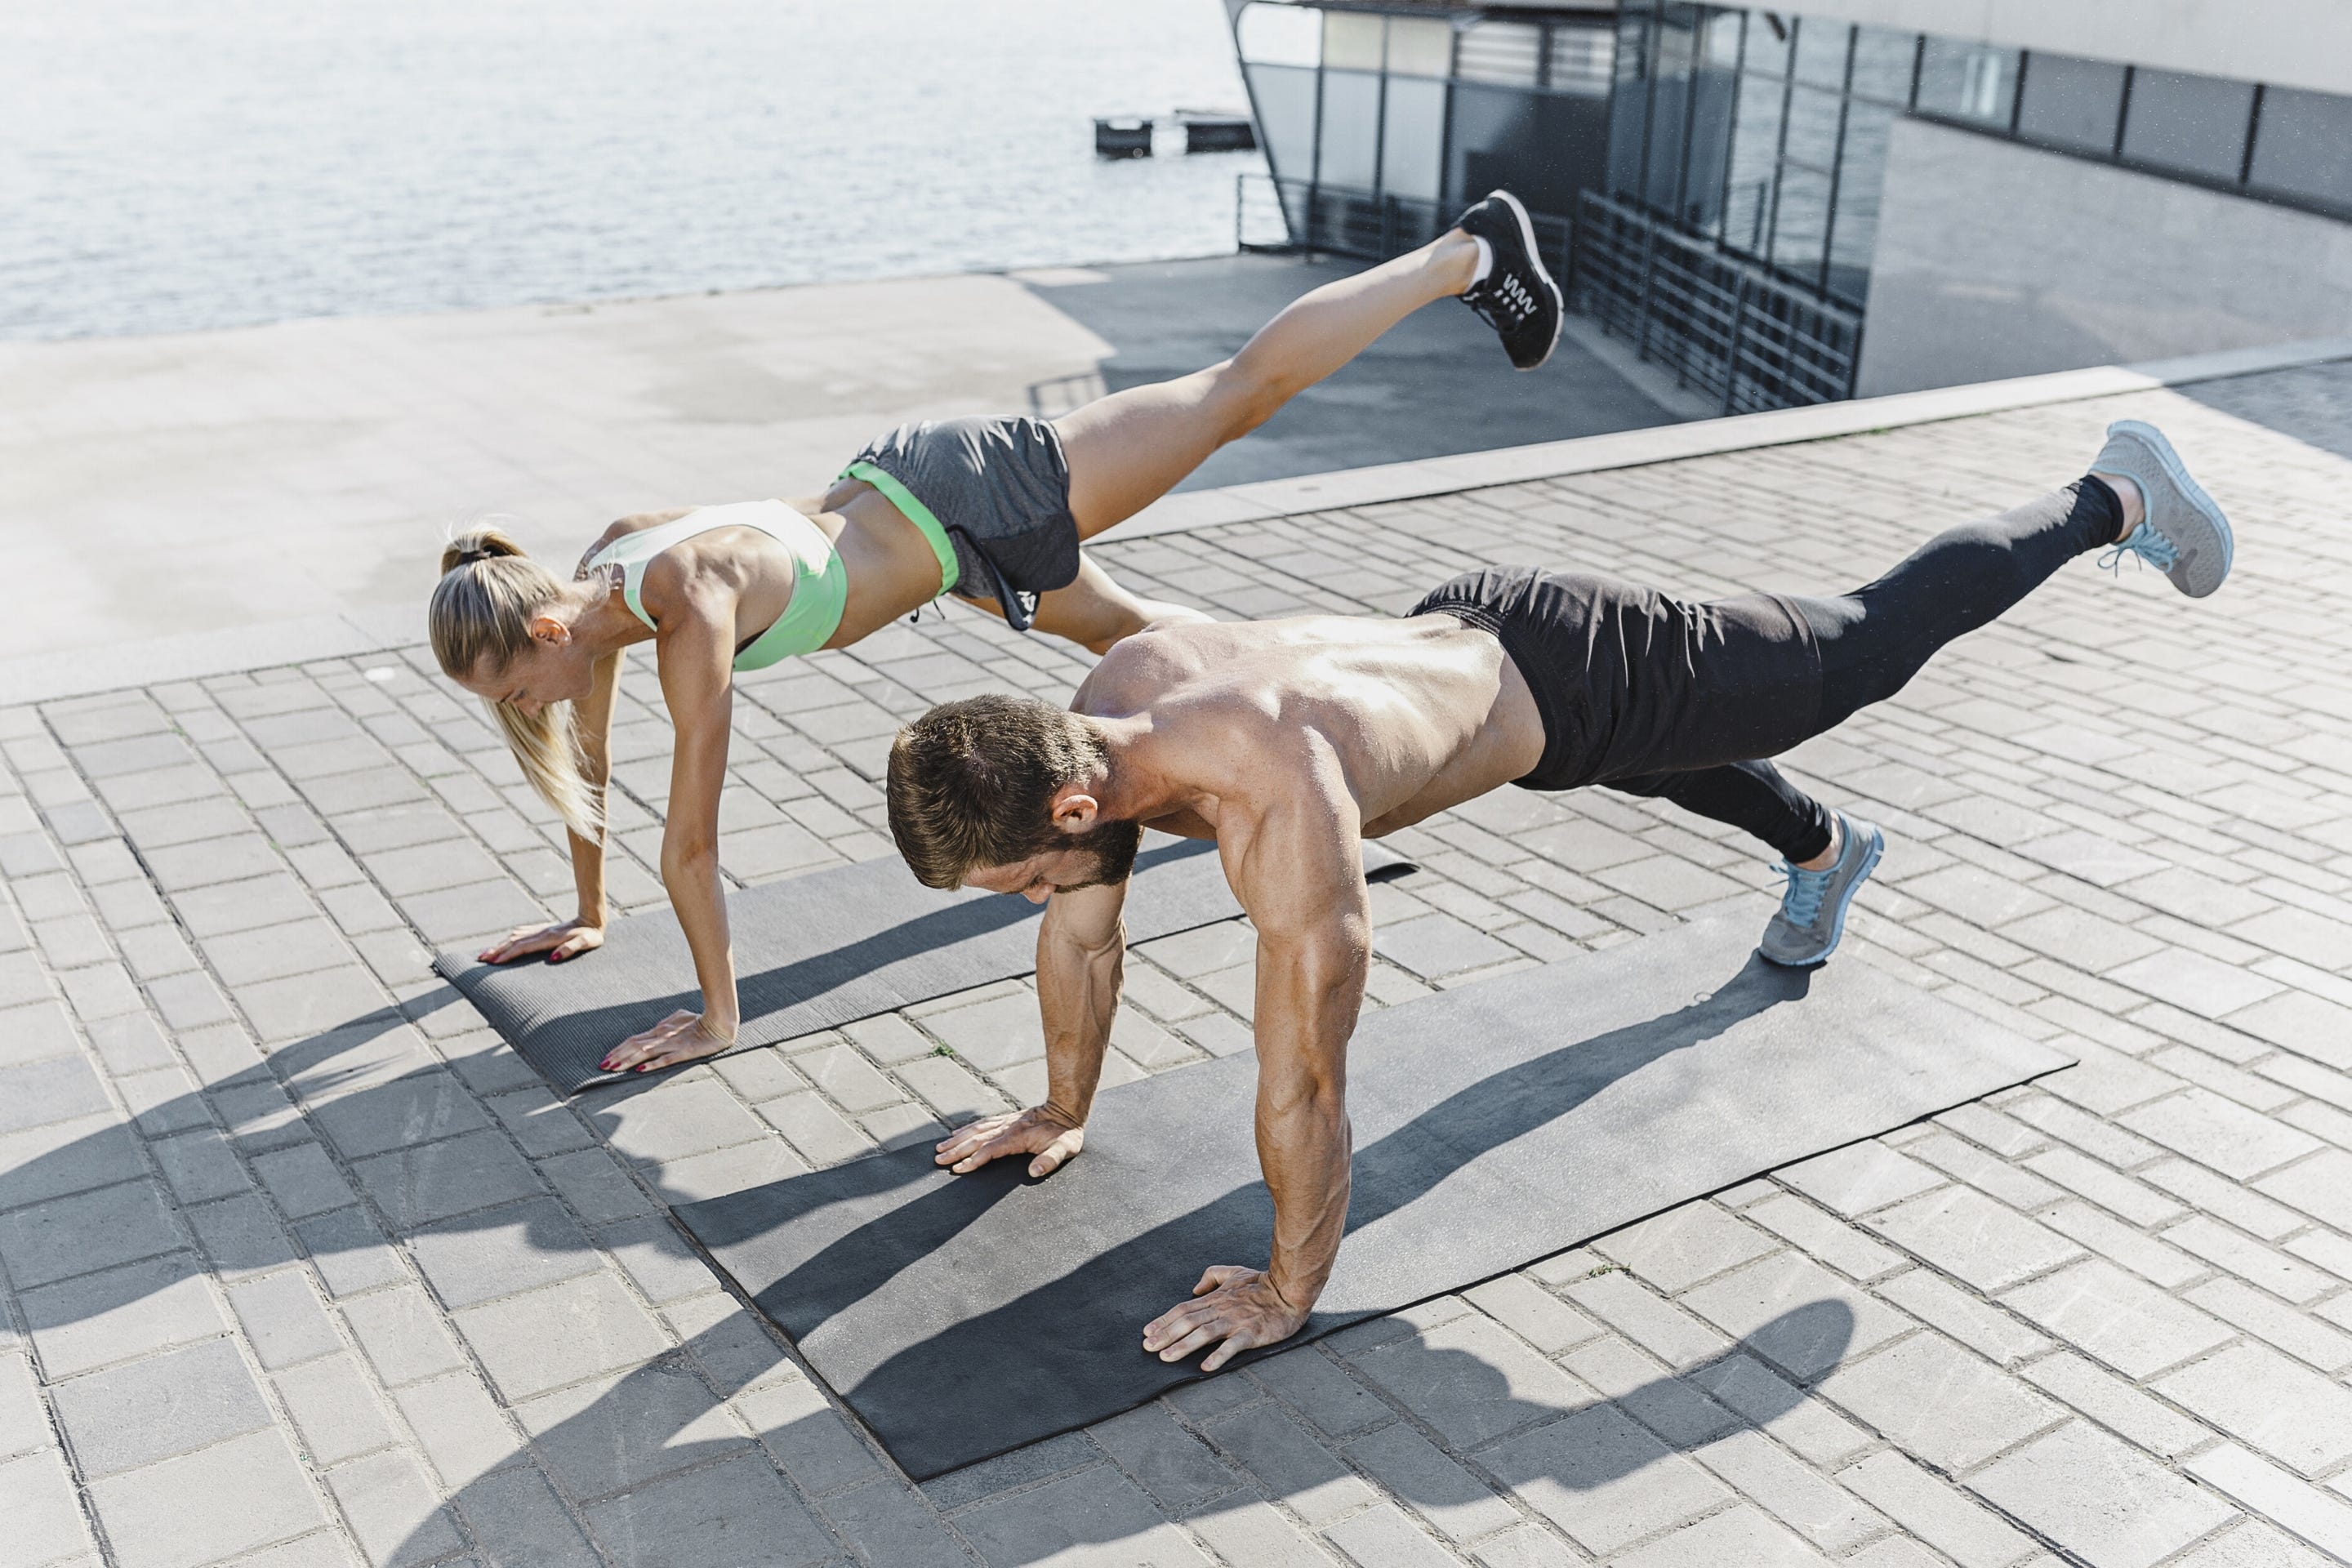
Move 2: The Bird Dog
Although its name is a bit odd, the bird dog exercise is performed on your hands and knees — a position called quadruped. Focus on maintaining tight abs throughout this exercise and avoid letting your belly drop towards the ground. Use the core muscles to stabilise your midsection while you move your arms and legs.
In quadruped, keep your neck straight by looking at the ground between your hands.
Lift your right arm straight out in front of you until it’s parallel to the floor.
At the same time, squeeze your glutes and lift your left leg straight out behind you until it’s parallel to the floor.
Keeping your right arm, torso and left leg in a straight line, hold this position for 10 seconds. Do not allow your hips to rotate — your pelvis should remain parallel to the ground throughout this exercise.
Slowly lower back down and repeat on the opposite arm and leg.
If this exercise seems too difficult or you find that you can’t keep your back straight, a simple modification is lifting your arm by itself, then your leg until you are strong enough to move them simultaneously.

Move 3: The Side Bridge
Lie on your side on a firm surface. Place your forearm on the ground, under your shoulder.
Reach across your chest with the other hand and place it on the opposite shoulder. This will help stabilize your trunk.
With your legs stacked on top of each other, bend your knees to 90 degrees.
Push down through your forearm and bottom knee to raise your body off the ground. You should be in a straight line from your head to your knees.
Work up to holding this position for 10 seconds on each side.
When this exercise is no longer challenging, stagger your legs slightly and straighten your knees. Press down through your forearm and feet to lift up into the side bridge.
Flexibility-Exercises
Flexibility: Adequate flexibility, especially in the hamstrings, hip flexors, and lower back, is essential for maintaining a healthy spine. Research published in the Archives of Physical Medicine and Rehabilitation (2011) demonstrated that a lack of hamstring flexibility is associated with the development of low back pain. Improved flexibility can reduce tension on the lower back and allow for better posture and movement patterns.
Combining strength with stretching exercises is key.
Watch the entire video of the exercise demonstrations here or jump to the specific exercises.
The Cat Camel
Get on all fours and slowly move back and forth from a downward spinal curve with the head looking up like a cat and then move into a rounded spine while the head looks down like a camel. Each cycle should take about three to four seconds. 7-8 cycles are all that is needed.
Gist: Only do 7-8 cycles. More than that could be bad.
The Psoas Stretch
Get into a lunge position with one leg in front and raise your opposite arm overhead as you descend into the lunge. Then, bend your torso slightly to the side away from your back leg and drop your shoulder back to further target and stretch the psoas. You should feel a deep stretch in the psoas located in front of the hip of your back leg. Hold this position for a couple seconds and then take a step forward to switch your front leg and the raised arm and repeating the sequence. The goal is to perform six strides at a time.
Gist: Hold for 2 or 3 seconds on each side. Do 6 cycles per side.
Hip Airplanes
Assume a single leg stance, brace your core, and grip the floor with your planted foot. Then, place your hands on your hips and rotate your torso forward over your planted leg while kicking your back leg behind you. Keep the back leg completely straight and your planted leg knee in a slightly bent position. Next, rotate your hips in towards your planted leg (hip internal rotation) and then transition to rotating it away from your planted leg (hip external rotation). Aim for a total of 3 sets of 3 reps with this movement.
Gist: Do 3 sets of 3 reps.
Spine Hygiene
Stand with your arms overhead and count to 10. Then, reach higher and farther back for another count of 10. In this position, deeply inhale and work your way into an upright and stress free standing posture. By breaking up every 20-30 minutes of prolonged sitting with this drill, you’ll be able to prevent an excessive buildup of stress on your lower back.
Gist: Stand with the hands behind your back. Put your hands over your head for 10 seconds. Reach higher and further for another 10 seconds. Deeply inhale and go back to the normal free standing posture.
Balance-Exercises
The article "Balance & Back Pain" from The Neuro-Muscular Clinic (2020) discusses the relationship between balance and back pain. It explains that people with low back pain often have reduced balance due to changes in muscle activation and reduced sensory feedback. This highlights the importance of including balance training in back pain management.
Depending on how much time you have available, you may include balance exercises too.
The following exercises can easily be done at home and included into your day.
Sideways walking: Stand with feet together, knees slightly bent, and step sideways in a controlled manner. Perform 10 steps each way
Simple grapevine: Walk sideways by crossing one foot over the other, attempting 5 cross-steps on each side
Heel-to-toe walk: Place your right heel directly in front of your left toe, then alternate. Try to perform at least 5 steps
One-leg stand: Stand facing a wall, lift one leg, and hold for 5-10 seconds. Perform 3 times on each side
Step-up: Use a step to step up and down slowly, performing up to 5 steps with each leg
Standing on one foot: Try to balance on one foot for as long as possible, aiming for 10 seconds on each side
Heel-to-toe walking: Walk in a straight line, placing your heel directly in front of your toes for 20 steps
A well-designed strength training program will naturally cover all three elements, thereby reducing the chances of getting hurt both inside and outside the gym.
There is little sense in focusing on spine health alone, but rather making it part of a routine that improves your overall health and fitness.
A life without pain - much more fun and fulfilling.
So how did my story go on?
After a long and nerve-wracking time, I consulted a chiropractor.
He first couldn't find an explanation: "Can't be arthrosis, you`re too young."
Then he placed me in front of a mirror with my shirt off. He pointed to the different heights of my shoulders, which either was a cause or consequence of my body adapting to the pain.
My thoracic vertebrae were not aligned, even I could see that. He explained to me that this is the reason all joints in my left body including my lower back are in pain.
I cannot be sure that is right, but what I know is: After he treated my cervical spine with a few careful moves, it took me a few more days before I could finally live pain-free and enjoy exercise even more.
So my case was different from the majority of all back pains - mine had a specific reason.
The exercises discussed don`t require a gym membership.
If you want to avoid back pain in the future, set aside a few minutes every day or every second day.
Your spine will thank you.
https://dynamicchiro.com.au/2021/05/stuart-mcgill-exercises-lower-back/
I've worked with physio's a few times and given many of the exersises in the article. All solid advice.
I wish doctors would have this article handy to share with people. Best I ever got was it'll be better in a few weeks no matter what you do.
One thing that helped last time was brisk walking. Running or walking would hurt but brisk walking was relief. It kept me moving and what once would be days or weeks of pain was resolved the same day.
We all need to apply these teachings.